
Base Painting of P-38G
- Lukasz Gmerek

- Oct 20, 2021
- 8 min read
Updated: Jun 23, 2023
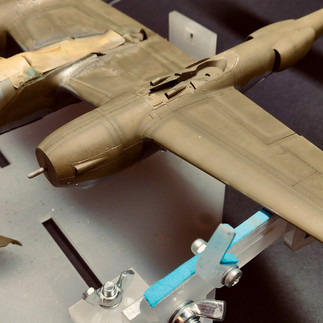
I must say that painting this model was hell of a ride for me. Definitely the most complex paint job I have done so far! Camouflage itself seems easy, just two colors - Olive Drab and Neutral Grey in a nice simple pattern, but as they say the devil's in the detail.

Aircrafts destined for the warfare over Pacific were disassembled and shipped overseas and reassembled at the destination point. For the shipment duration certain panel lines were sealed with the tape and rest of the aircraft fuselage was exposed to the winds, rain and other kinds of bad weather. When those aircrafts were reassembled and the tape was removed it revealed a very distinctive pattern of quite clean panel lines which were protected by the tape with dirt and grim accumulated around it and a bit more darker fuselage in general.
I decided I want to recreate this interesting pattern in my paint job. Aside of showing the pattern itself I wanted to show effects of different elements working on the fuselage paint during the shipment and afterwards during the missions flown over Pacific theatre. In addition to that I wanted to recrate paint chips by actually chipping the paint with the help of A.MIG 2010 SCRATCHES EFFECTS and A.MIG 2032 ULTRA LIQUID MASK. All of this made the painting process quite a challenge! I literally had to sit down and think how to tackle that. First I had to figure out the order in which I will add different layers of paint taking into account that I will have to use masking tape in the process. Secondly I had to handle time constraints - whole painting process starting with application of chipping fluid and liquid mask and ending with peeling of the paint should be done in one painting session - removal of the paint should be started ideally as soon as the paint is dry to the touch - the more time passes the more difficult it is to peel the paint and by that there is less control over the process.
Solution I took for the second problem was to work only on one area at a time - the most important aspect of such approach was that I did not rush! I had this peace of mind that during given painting session I was focused only on the wings for example and that I would have enough time to go through whole process. Downside of this was that I had to be careful to maintain consistency in the pain job between different sessions, but I think I managed to that pretty well in the end.
Metallic Base

Before applying a dark base coat of Mr.Hobby GX-2 Black with my Iwata HP-CH airbrush I sanded the primed surface of the model with 4000, 6000 and 8000 grid sand paper to make it really smooth. As soon as a glossy base was dry I airbrushed a layer of Interactive XTREME METAL POLISHED ALUMINIUM this time using H&S Evolution Silverline airbrush with 0.2mm nozzle. As this metallic base will be mostly covered (except for the chipped areas) by camouflage colours I did not have to be 100% accurate and rigorous when applying it, but still careful about air pressure and speed as any overspills or others irregularities would be visible on next layers of paint.
Positive Rivets

It was the first time for me to use positive rivets set from HGW. As with any other new medium or after market solutions I was a bit reluctant and nervous to try it directly on the model so I decided to try it first on my test model. Additionally this helped me to decide on when in the process to apply the rivets - I saw two options, either to apply it on the metallic base or at the very end of the painting process on the camouflage colours. The tests showed me that application of the rivets directly on the metallic base is better choice, as they will still be visible in the end and additionally will have proper colour except for the tip of each rivet which will be sanded at the end of the build with fine grain sand paper to increase their visibility even more.

Application of positive rivets is really simple - just follow the instructions and be patient. I applied the rivets in the afternoon / evening and next day I carefully removed the transparent transfer film and cleaned off any traces of transfer glue and the final effect is amazing - much better that I though it would be!
Painting underbelly

It took me 4 sessions, each 2-3 hours long to paint the ventral part of the fuselage. I started with the wings, then central gondola and at the end back of the booms and empennage. Fourth session was to correct the mistakes and blend everything together. First I applied chipping fluid (A.MIG 2010 SCRATCHES EFFECTS) on to the surface and as soon as it was dry I started painting ~4-5mm wide stripes over the panel lines which I pre-selected to imitate tape sealing. I used for that diluted base colour of AK RC261 Neutral Grey 43 with a bit of AK RC004 Flat White (ratio ~6:1). I airbrushed it using Mr.Hobby PS-770 Mr.Airbrush Supreme.

Next I pre-shaded certain panel lines with heavily diluted Mr.Hobby H077 Tire Black and some of the access doors and other small panels with Mr.Hobby H001White using the same airbrush. Next I waited about 10-15 minutes and started masking grey painted panel lines with the 3mm AK Masking Tape for curves. Now it was time for the coat of actual camouflage color. I diluted the paint quite a lot to be able to apply a few thin layers so that the pre shading is still visible - for that I used Iwata HP-CH airbrush.

Then I followed with imitation of dirt around sealed panel lines - here I used Mr.Hobby H077 Tire Black which I strongly diluted to pretty much a consistency of a wash and applied it very carefully with Mr.Hobby PS-770 Mr.Airbrush Supreme airbrush.
To brake monotone color over the panels I used post shading technique. I mixed original color ( AK RC261 Neutral Grey 43) with a bit of AK RC001 Flat Black to get a darker shade and applied it over the panels using Uschi van der Rosten stencils set. Then I did a lighter mix and repeated the same operation. To soften the effect I airbrushed very thin layer of original color over some of the areas.
In the next step I removed masking tape and here unfortunately it turned out that the paint did not have enough time to dry before the tape was applied and in some places (especially on curved surfaces) it peeled of. Another issue which I expected was that the color different between those panel lines and the fuselage turned out to be a bit to strong.

To remedy both problems I made another mix of the original and black colors (this time ration was ~10:1) and very carefully airbrushed int on the previously masked panel lines - again I diluted the mix to the consistency of the wash and applied it with very low pressure being as close to the surface as possible as I did not want to overspray the already painted dirt. Last step was to actually chip the paint - for that I prepared lukewarm water, brush and sharpened toothpick. Application of water on to the surface activated the chipping fluid and what was left to do was to use the small brush or toothpick to scrub the surface in places where I wanted
Painting top of the fuselage
First I had to create a demarcation line between the camouflage colors - for that I used rolls of UHU patafix know as well under the generic name of the original product, Blu tack. What is really nice about this pressure sensitive adhesive is that it allows to control how soft the resulting edge will be - the thicker the putty the softer it is. After I created with it a nice wavy patter I had to secure the already painted parts of the fuselage. I used for that kitchen foil and Tamiya masking tape.

As it was the case with the underbelly, it took me 4 painting session to finish the dorsal part of the fuselage, though some steps of the process were different.
At the beginning I airbrushed chipping fluid and additionally I applied A.MIG 2032 ULTRA LIQUID MASK with sponge in places of heavy chipping - wing roots and very front of the booms. As soon as it was dry I airbrushed some of the panel lines with the lighter shade of original color (AK RC023 Olive Drab) to which I added a bit of white (AK RC004 Flat White) - ratio of ~6:1. Having gone through the experience of applying the masking tape to early I waited a bit longer - about half an hour. Having masking tape applied I strongly diluted the original color and airbrushed one/two very thin layers of it with Iwata HP-CH.

Next I prepared 4 different colors by mixing following paints: RLM80 Olive Green, Mr.Hobby H338 Light Gray, Mr.Hobby H001White, Mr.Hobby H002 Black, Mr.Hobby H037 Wood Brown, Mr.Hobby H027 Tan. I mixed them in a way to achieve brownish and greenish shades - some darker and some lighter than original color. Next I airbrushed one after the other on the fuselage using Uschi van der Rosten stencils set. I tried to differentiate as much as possible application of different colors to different parts of the fuselage to get nice discolorations and paint fading effect. Finished with airbrush application, next step was to use exactly same color mixes to introduce more variety this time with the sponge technique - I just dabbed the sponge in the paint, then dabbed off the excess on a paper towel, and pressed the foam on the fuselage in certain areas. Next I mixed Mr.Hobby H037 Wood Brown and Mr.Hobby H002 Black, strongly diluted it and airbrushed over certain panel lines. Last thing to do for this step was to again airbrush very thin layer or two of the original paint to blend it all together.

Next I airbrushed dirt and grim around sealed panel lines in a same way as for the other camouflage color before. When that was done I started to remove the masking tape and it turned out that waiting 15 minutes longer before applying it almost did a trick - I had only a few places where the paint peeled of together with the tape. Lastly I activated chipping fluid by water application and pealed of the paint when it was needed. For larger areas and bigger chips I used tooth brush, for others toothpick was more than enough.
Blending it All together

The idea from the very beginning was to show an aircraft which had already flown some missions - my assumption was then that in time the difference between sealed panel lines and rest of the fuselage would be fairly diminished due to exposure to the weather and usage. Looking at the effect I had at that stage of painting I could clearly see that the color difference was to stark, so to correct that I used exactly same technique as on the underside - I mixed original color with white but at different ratio (~10:1) and airbrushed it carefully over the previously sealed panel lines.

Next I did all the needed corrections - sides of the fronts of the booms and central gondola required the most work as there are the connections between colours of the fuselage and panel lines with were sealed with the tape. Some places were really tricky to correct and it required a lot of patience and colour changes in the airbrush cup.
Then I carefully checked rest of the fuselage and found a few places which required fixing as well.
At this moment there was one last step to be done - secure all the work with the clear gloss coat. I used for that Mr.Hobby GX-112 GX112 - this layer finally brought everything together.

I am really happy with the final result! Of course it will be further enhanced with different weathering techniques, but the base coat itself introduces a lot fo the variety to the paint and adds a lot of interest to the model. I tried and picked few more techniques during that paint job and I feel definitely more confident with using the airbrush - to be honest I feel like achieving next level of miniatures painting!
Next step is to apply decals and then doors will be open for weathering - one of my favourite stages of model building.
Please check the gallery below and in case of any questions of feedback please leave a comment. Till next one!


Comments