
Jumo 211engine for Ju-87 Stuka
- Lukasz Gmerek

- Nov 25, 2020
- 3 min read
Updated: Jun 23, 2023
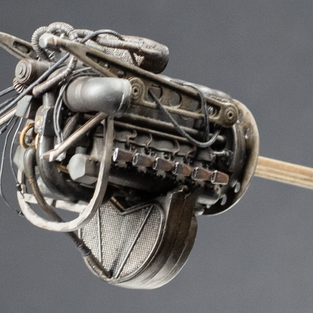
The Junkers Jumo 211 was a German inverted V-12 aircraft engine primarily used in bombers like Ju-87 Stuka which I am currently building. I was a bit concerned of what would be the final effect as this was first time for me to build inline engine, but taking into account that Airfix included an option with exposed engine I could not resist it. In the end I thing it worked out pretty ok - hope you will like it as well dear reader.
First think I had to decide upon was either to use Aires 4006 Junkers JUMO 211 resin engine or moulded plastic one being part of the Airfix package. Comparing both of them I decided to go with in-box one - quality of moulding is really very good in my opinion and it felt like a lot fun to put it all together. As I already had a resin counterpart I decided to use some of the PE parts and one or two pieces which looked better than the plastic ones.

I started with cutting out all parts from the sprues and cleaning them up. Then I had to think carefully which parts I want to glue together now and which ones should stay separated for ease of painting and to enable addition of hoses, cables and wires in different places of the engine itself. Then I enhanced Super Charger and Oil Cooler with Photo Etched parts from Eduard 49894 set. Next step was to prime everything with Mr Finishing Surfacer 1500 grey.

All the parts which will have metallic finish were base coated with Mr Colour GX2 gloss. Engine bearers and ring frame got German grey beige A.MIG02. Engine itself was airbrushed Tire Black (Mr Hobby Aqueous) with Iwata HP - CH and then post shaded black (Tamiya flat) using my PS-770 detail airbrush. Radiator and Oil Cooler were painted with AK Xtreme Metal colours.

Main supply lines were painted Dark Iron Mr Metal Colour and then buffed using dust-free swabs. Next step was to airbrush engine with Iron Metal Polishing Powder from Ushi diluted with thinner, wait a bit and polish it with dust-free swabs, Then I enhanced the shine on the larger surfaces by applying more powder using cotton swabs and polishing it once more - that gave nice depth and kind of preshading effect.

Next step was to add main hoses and wires on the bottom of the engine - here I used different sizes of Lead Wire from plusmodel and Albion alloys aluminium tubes - I painted them with AMMO Mig acrylics. When that was done I mated together all the engine parts (excluding engine bearers and ring frame which will be weathered separately).

Another step was to apply a gloss clear coat using Aqueous hobby paint. Then I decided to scratch build Vent Lines (coming from the Oil cooler to the back of the engine). Those lines have very distinctive braided look. To achieve such an effect I used 0.8mm Lead Wire from plusmodel on which I winded up 0,13mm copper wire. Then I basecoted it with grey, then coat of tire black paint, clear coat at the end and then glued it to the engine. Last step before proper weathering begins was to apply Black Wash from AMMO Mig into all the crevices and panel brakes.

After that I used AMMO Mig Starship Wash which was applied as a heavy filter to distinguish top and bottom parts of the engine.Lastly I used Track Wash for the Oil Cooler and Radiator. Then I used AK Dust and AMMO Mig North Africa Dust in places which could be more exposed to the dirt. Another gloss coat followed to protect all the work. Now I used metallic Oil Brushers to differentiate a bit top of the engine and then different Streaking Brushers to simulate accumulated dirt and usage of parts. On top of that I used AK Shafts & Bearings and Engine Turbine washes in random places to introduce even more variety.Then I append another clear coat - this time flat mat.

What followed was different kinds of pigments and AK weathering pencils. In the mean time I separately painted engine exhausts stubs - on the metallic base I applied Truck Rust wash. Then rust and smoke pigments. Stubs endings were lightly touched with AK aluminium weathering pencil and insides filled with black wash. Engine bearers and ring frame elements were painted and weathered as well and mated to the engine. Then I scratch build missing hoses, lines nad wires which are visible on the sides of the engine and follows to the rear and will be connected to the firewall at the front of the cockpit at the end of the build. Last part was to apply a misty mat clear coat to connect everything together and use Engine Fuel and Oil washes from AMMO Mig to imitate fresh stains.


Comments