
P-38G Booms & Fuselage Assembly
- Lukasz Gmerek
- Sep 20, 2021
- 6 min read
Updated: Jun 23, 2023
If not counting 2 weeks in between I had almost half a year brake from modeling! That was definitely too long, but fortunately all the activities that were taking all of my free time are over now and I can put my focus on my passion again! Being back in business means that you my dear reader can expect more frequent updates on my current and future projects.
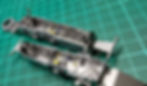
Getting back to mighty Miss Virginia - having cockpit, gun bay and flaps housings in place it is time to assemble booms before commencing with the rest of the fuselage. Before starting the construction of the booms themselves, I had to prepare sub assemblies which included main wheel wells, superchargers, oil coolers and radiators.
Booms

I started with cutting out all required parts from the sprues and cleaned them up. Next corresponding PE elements were added with the CA glue. Some of the smaller parts were brought together and then everything was cleaned with IPA and primed with Mr.Hobby SF-286 Mr. Surfacer 1200 using airbrush. Interiors of oil coolers, radiators and radiators covers were sprayed accordingly using Tamiya paints and then top coated with clear gloss Mr.Hobby GX-112 GX112 Super Clear III UV Cut Gloss. Lastly, as the interiors of both oil coolers and radiators will be barely visible I applied simple and fast weathering and set it aside.
Main Wheel wells

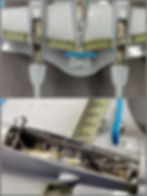
With all parts already primed I applied Mr.Hobby GX-2 GX2 Ueno Black Gloss to get nice glossy surface as a base for the metallic surface, for which I used AK-Interactive AK477 XTREME METAL CHROME - applied with airbrush of course. In the next step I painted all the small details using acrylic water based paints from A.MIG and Vallejo. Now it was time to secure all the work and for that I used Mr.Hobby GX-112 GX112 Super Clear III UV Cut Gloss. As soon as it was dry I assembled all the parts together. I had to take care here as some of the parts are really fragile and easy to brake, especially parts of the main landing gear struts, which by the way after being assembled will be protruding out of the bays. Other approach would be to add them later in the build but after dry checking first it turned out that it could quite hard to do so when whole wheel well would be assembled and fitted in the boom, so I decided to follow the assembly booklet. I will just have to be more careful through the rest of the build.
As a next stage I decided to add the wires line that I saw in the photos of the real P-38. It required work and a lot of patience as to imitate the look of it I had to take wire of very small diameter (I used Braided 0.3mm wire from modellingtools.co.uk), cut 6 pieces of similar length and bend it accordingly so that they are aligned nicely. Then I took my spare PE and cut very small gills equal in width to the width of the wires line and added them in few places over the length of the line. As the wire itself was already in proper color I brush painted only the gills with acrylics and the mounted it inside the wheel well.
To start weathering I used A.MIG 1611 PLW Black Night as a pin wash and A.MIG 1608 PLW Dark Green Gray more as a general wash. After 10-15 minutes I used brushes to remove excess as well as to nicely blend it on the larger surfaces. As soon as washes were dry I applied AK 2029 Landing Gear Wash and AK 2032 Wash for Shafts and Bearings to imitate grim and filth on the main gear struts. Next I applied semi-gloss coat of Mr.Hobby H102 H-102 to protect the work. Then to emphasize used and dirty surfaces of the wheels I used A.MIG streaking brushers - Medium Brown and Dirty Grey. Lastly I imitated dust by applying Streaking Dust and blending it nicely with the brush - the effect is very visible so it is more than enough just to touch the surface with it.
Superchargers

For the superchargers I used resin counterparts from Eduard. Those are much more detailed compared to original parts. Though they will be installed at the later stage of the build I decided to them while working on the booms. First I checked if I will be able to squeeze them after all boom elements are set together - dry fitting showed that it is possible. I started with primer layer for which I used Mr.Hobby SF-286 Mr. Surfacer 1200, next black base with Mr.Hobby GX-2 GX2 Ueno Black Gloss and on top of that I airbrushed metallic colors according to assembly booklet. To secure the work Mr.Hobby GX-112 GX112 Super Clear III UV Cut Gloss was applied on top.

To recreate heavily dirtied and sooted look of the chargers I started with bold application of A.MIG 1002 TRACKS WASH with the brush, paying attention to introduce irregularities in the amount of the wash in different places of the chargers. After 15-20 minutes I secured the work with the layer of Mr.Hobby H103 H-103 Premium Clear Flat. Next I did detail painting using A.MIG water based acrylics (Vallejo Silver Grey 70.883, A.MIG Old Rust 0042 and Dark Rust 0041)

Next I added layer of soot and grim by pinpoint airbrushing with my Mr.Hobby PS-770 - for that I used greatly diluted Flat Black XF-1 and Clear Blue X-23 Tamiya paints. Then another coat of Mr.Hobby H103 H-103 Premium Clear Flat followed. Lastly I added layer of pigments to emphasize dust dirt and flat look of the superchargers. Here I used few different color pigments, first A.MIG 3001 Black, then A.MIG 3002 Light Dust. next A.MIG 3008 Track Rust, AK-20422Dark Rust and AK-2043 Ocher Rust at the very end.
Most probably I will adjust the look of the superchargers a bit at the very end when they will be installed on the aircraft just so they are matching the grime and soot on the booms aft of them.
Boom Assembly
Having all the sub assemblies ready I could commence with the construction of the booms. Following the assembly booklet, first I mount the wheel well to the one side of the boom, next I fitted the weight ball (which by the way is delivered together with the model itself) and to just to be safe I added a CA glue around it. Then I closed the boom with other half of it - here additionally to Mr. Cement S I used Tamiya Cement to enhance the bond. Next Oil Cooler was constructed and fitted at the front bottom of the boom, next I followed with attaching radiator covers. Next step was to attach supercharger base to the top part of the fuselage and then I inserted the boom from the bottom again using Tamiya Cement and Mr. Cement S. Of course all the steps were repeated for the second boom.
Fuselage
To finish the fuselage construction what was left was the empennage which was very simple deal due to Tamiya design - just cut out parts from sprues, clean them up and attaching everything together. Next I handled identification lights under the wings and on the center gondola. Under the wings light recesses were painted with X-11 Tamiya, then clear parts were glued and masked (using New Ware AM0661 masks set), for the gondola lights they were fist painted accordingly with X-27, X-23 and X-26, then attached to the base and masked as well.

Despite adding a lot of after market parts I was able to achieve great part fit and putty was needed only in couple of places in limited amounts. I used it only on the top of the booms between superchargers and radiators to hide connection line between two halves (behind radiators I left it as is as in the real aircraft). Another place for the putty was just in front of the root leading edge of the wings where top plastic part connects to the bottom one - there should be no panel line there. Last place was on the bottom of the aircraft just in front of the wheel wells. As the cavities were very small I used Mr. Dissolved Putty for that. The only exception was right wing trailing edge just right of the supercharger which was damaged by me when I was preparing for the installation of the flaps housings. Here I used Tamiya Basic Type Putty to fill the cavity. As soon as it was dry I sanded it and checked if all the problematic places are covered. It turned out that I had to repeat the procedure in some of them. In the next step I masked gun bay, cockpit and nose and main landing gear bays using Tamiya tapes, kitchen foil and for the gun bay I help myself using original gun bay door parts. Now I cleaned it with IPA and model was ready for priming. During first stage I airbrushed Mr.Hobby SF-285 Mr. Surfacer 500 in all places which had putty applied - I did that to check again if everything looks ok. It turned out that I had a bit more work to do before commencing with the proper layer of primer - this time I used Mr.Hobby SF-286 Mr. Surfacer 1200 airbrushing it over entire fuselage with my Harder & Steenbeck Evolution airbrush. Now the fuselage is ready for the paint job!


