Airacobra Painting and Decaling
- Lukasz Gmerek

- Sep 12, 2024
- 6 min read
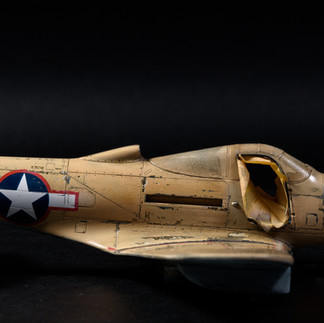
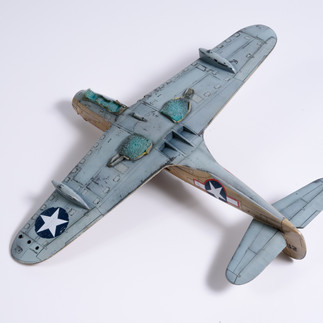
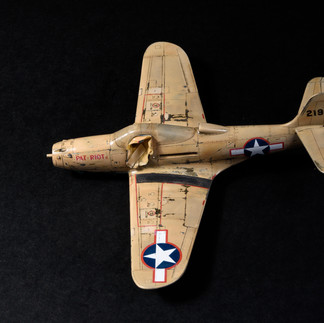
My model represents the Bell P-39Q-1-BE Airacobra (42-19467) as it appeared at the end of 1943, after being stationed on Kanton Atoll in the Phoenix Islands for several months. The harsh environmental conditions on the atoll, which was almost completely devoid of vegetation, necessitated the repainting of the Airacobras. The upper and side surfaces were painted in a sand color, while the lower surfaces were coated in light blue. These repaints were done in the field with whatever tools were available. This, plus environmental conditions of salty water and high humidity contributed to fast deterioration of the topcoat, particularly on the upper surfaces, which were constantly exposed to the tropical sun.
By the time the P-39s arrived on Kanton Atoll in March 1943, they had already seen over a year of service with the 45th Squadron, which had been stationed in the Hawaiian Islands. As a result, the aircraft already showed significant signs of wear and tear. To accurately depict this history, I decided to use a multi-layer chipping technique in the paint job. This allowed me to create a realistic finish, complete with scratches, scuffs, and other paint abrasions. The deepest layers revealed the natural metal finish (NMF), followed by the original Olive Drab and Neutral Grey camouflage, and finally, the sand and light blue colors applied on Kanton Atoll. I also used sanding sponges to simulate the fading and stripping of the topcoat caused by the harsh environmental conditions.

Painting Process
With the model already primed, I airbrushed it with Polished Aluminium and protected it with a layer of gloss varnish. The painting process involved five main stages: applying the original camouflage, adding a lighter hue of sand, painting the final sand and light blue layers, using a sanding sponge for additional effects, and finally, creating and painting the walkways. Below are the details of each stage:
Original Camouflage
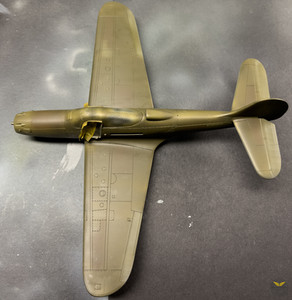
I began by applying AK chipping fluid, airbrushing two layers and allowing them to dry. I then thinned Neutral Grey from Mr. Colour and applied several thin layers to the bottom surfaces. Smaller elements like ailerons, flaps, stabilizers, and hatches were painted with Mr. Colour Light Gull Grey. Random panels and crevices received a layer of AK Dark Grey, followed by two more thin layers of Neutral Grey.
For the upper and side surfaces, I followed the same process using Olive Drab as the base color, with additional shades of White Grey and Red Brown. I kept this layer simple as it will be barely visible in the end. Once the paint dried, I concentrated the chipping on areas like the wing roots, sides of the front gun bay, top surfaces of the wings, and added small scratches on the aft fuselage. The bottom surfaces also received some chipping. All work was then protected with a layer of gloss varnish.
Once the paint dried, I concentrated the chipping on areas like the wing roots, sides of the front gun bay, top surfaces of the wings, and added small scratches on the aft fuselage. The bottom surfaces also received some chipping. All work was then protected with a layer of gloss varnish.
Faded Base Colour

As the base layer of paint degrades, it becomes less saturated, with the color lightening. Previously, I painted these effects by hand, but this time, I decided to use chipping fluid again. After applying two layers to the top surfaces, I airbrushed a few thin layers of Mr. Colour Pale Brown 51 mixed with White 316 on selected surfaces. Once dry, I chipped the paint again, resulting in multi-layer chipping on certain areas of the model. Although the effect was already looking good, slight "steps" between the layers became visible in some spots. I remedied this by gently sanding those areas with fine-grained sanding sponges before protecting everything with another layer of gloss varnish.
Final Coat
I applied AK chipping fluid once more, starting with the bottom surfaces. I thinned Light Sky Blue from AK and airbrushed several thin layers. Using Tamiya Medium Blue and a mix of Mr. Color Azur Blue and White Grey, I painted selected panels and parts, focusing darker colors in crevices and shaded areas. Small details like hatches and openings were painted with AK RAF Sky Grey mixed with AK White Grey. I then used a marbling technique with stencils, applying AK White Grey and Mr. Color RLM65, which I blended with thin layers of Light Sky Blue.
The top and side surfaces followed a similar process with Mr. Color Pale Brown as the base. I used a mix of AK Dark Grey, AK Buff, AK Cream White, and Tamiya Desert Yellow for the paneling and marbling, shading some panel lines with Tamiya Desert Yellow. Everything was then blended with the base color of Mr. Color Pale Brown and AK Buff.
Once the paint dried, I began the chipping process, focusing on small scratches on the bottom surfaces and more extensive chipping on the sides and top surfaces. I paid particular attention to the front gun bay covers, wing roots, aft fuselage, and empennage. Generally, the further back on the aircraft, the less chipping was applied.
Final Coat Deterioration
To enhance the effects of fading and abrasions, I took an additional step. Using a sanding sponge, I lightly rubbed the surface of the model, which had been moistened with water. This produced very realistic effects, but I had to be cautious not to overdo it, frequently checking the results. I used a sponge with a 400-grit rating.
Next, I polished all surfaces with polishing pads, preparing them for the application of filters to blend the surfaces further. For the top and sides, I used an Industrial Dirt oil wash, with enamel Afrika Korps in certain areas. On the bottom, I applied PLW Dark Sea Blue. Once touch-dry, I removed the excess with cotton pads and protected all the work with a layer of Mr. Color GX 112 gloss lacquer.
Walkways
The walkways, located at the wing roots, are mat and non-slip surfaces. To replicate them, I used a special paste from A. Mig. I masked the surrounding areas with masking tape and metal foil, then applied the paste with an old brush. After a few hours, once dry, I lightly sanded the walkways to reduce the roughness. I then painted them, starting with Pale Brown, followed by Dark Gull Grey and Dark Grey, and finally blending everything with NATO Black. Once dry, I lightly sanded them again to achieve the desired effect.
Decaling
The decals, printed in-house by Eduard, are of the new wet-transfer type. I began by applying the insignia and numerals, followed by the airframe stencils, using Micro Set and Micro Sol for application. Eduard's wet-transfer decals have a significant advantage: the transparent film can be removed, creating a painted-on appearance. This was my first time trying it. After waiting a few hours, I attempted to remove the film using Odorless Thinner, but without success. Instead, I gently rubbed the decal surface with a toothpick, and the film began to peel off. With the help of tweezers, I successfully removed it from each decal and stencil without damage.
Next, I deliberately distressed some of the larger decals to match the worn look of the paint underneath, again using a toothpick. To reduce the contrast of the "fresh" decals, I rubbed them with a sanding sponge. Finally, I washed the entire model with water and a bit of dish-washing liquid to remove any residue from the decal application and finished with a layer of acrylic gloss clear coat.
Recap
This is by far the boldest paint finish I've ever attempted on a model. The surface is highly varied, with visible paint abrasions and scuffs of different kinds. Overall, I'm very pleased with the results of the multi-layer chipping technique. It creates incredibly realistic wear and tear, though it's easy to overdo. In hindsight, I left too much of the NMF layer visible, particularly on the front bay covers and wings, but this should be less noticeable after the weathering is completed. The sanding sponge technique also produced excellent results and is definitely something I'll explore further in the future.

As for the wet-transfer decals, I'm a big fan! Removing the transparent film takes a bit of time and patience, but the painted-on look is worth the effort. Now it's time for weathering and final assembly. In the meantime, please check out the photos of the painted P-39Q. I hope you like it. I'd love to hear your comments or opinions. Cheers!










Excellent work 👍
Can't wait the next chapter...