
Hawker Tempest Cockpit
- Lukasz Gmerek

- Jan 16, 2022
- 9 min read
Updated: Jun 23, 2023
First let me say say, that making this cockpit by using original, very detailed and crisp Eduard plastic parts straight from the box will yield a very good looking interior for the pilot, especially when used with the provided photo etched additions in the ProfiPACK edition. Nevertheless I decided to challenge myself and went for the fully resin cockpit available as the aftermarket set. Hopefully if done properly the result should be better than out of the box build.
Cockpit creation may be divided into two stages - creation of the inner cage - this is all resin, and preparation of left and right fuselage halves - this is of course original plastic plus some small resin additions. Let me start with the first part.
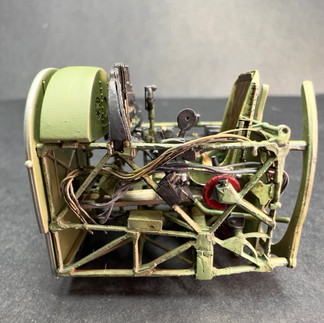
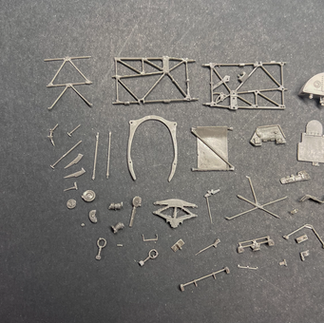
Inner Cockpit Cage

I started with the careful study of the attached instructions to have an idea what are the next steps and which of the original parts will be needed along the way. Next inevitable step is removal of parts from their casting blocks - as it is very messy and tedious (at least for me) I tend to separate all of them at once. I use for that different tools including Proxxon 230/E, modeling razor saw and side cutters - as there is tone of really small and tiny elements I had to do it very cautiously and slowly to not to brake or damage them. In the end I only crippled compass holder (part which is attached just under the main cockpit instruments panel), but I was able to fix it by adding a scratch built subcomponent. As soon as I had it all removed from casting block it was time to clean it up. For that I think two invaluable tools are modeling blade and high quality scraper. Additionally I used sanding paper of different grades. At the end I used one of my airbrushes to clean the parts from the resin residue, sprayed them with IPA and wiped everything with the brush. Lastly I prepared all required PE elements by cutting them out and bending accordingly.

I decided that I want to paint as much as possible with an airbrush to reduce the possibility of flooding really small details with the brush painting - for that to happen first I had to figure out which subcomponents I can combine together now so I have less separate parts for painting. Next I divided everything to two groups. First group received primer coat of Mr. Color 1500 black and then layer of base green gray color. I used back primer so that I could achieve preliminary shading after airbrushing base color. Second group was primed with Mr. Color 1500 grey and then base color layer of off black (mix of MR. Color Black and RAF Sky Grey) was applied. Next I returned to the first group and enhanced shading by application of diluted mix of Grey Green and Black - I concentrated airbrushing that on lower parts of the cockpit frame. There were exceptions to that process though - the most noticeable subassemblies with larger surfaces like pilot seat back plate or pilot seat itself after being primed were painted silver. As soon as it was dry I airbrushed layer of scratches effect and on top of that base color of Grey Green and immediately followed with darker tone to introduce shading. As soon as it was dry to the touch I started chipping the paint by application of water and rubbing the paint with the stiff brush. Another exception were kick plates of the rudder pedals which were painted silver.

Now it was time to combine different parts further to create subassemblies like left and right cage of the inner pit or rudder pedals - I used for that CA glue. Then I started painting all the details with different colors and brands of paints. It took me quite a while to finish as I had to check different references and photos to learn what colors should be used. Then I protected all the work with layer of clear gloss GX112.
Next chipping followed with acrylic paints - I started with a.MIG silver, then mix of Vallejo Luftwaffe Camo Green, White and Deep Yellow and lastly Rubber & Tires from a.MIG. For all three colors I used brush chipping technique and additionally for the mix I applied sponge chipping as well. Same mix was used now to paint highlights. At this moment I added all very small and fragile PE parts and painted them accordingly.

Now it was time to proceed with the most critical step of building the inner cockpit cage - assembling together left and right side which required precise placement of many tiny and fragile elements in between to construct the framework which holds together whole cage. First idea was to use a epoxy glue as I thought I would have a few minutes to adjust everything correctly before glue sets and bounds everything together - that unfortunately did not work. Why? I tried to add all required connectors to one side first and then add the other one. Unfortunately I was not able to maintain all parts in proper placement, so I tried another idea - this one worked perfectly. Instead of using epoxy glue I used CA and glued all required elements to one side, then added small amounts of glue to critical holding points on the other side and put it all together - as it was only a few of them I had just enough time to adjust them accordingly before CA glue set. Next I adjusted the rest one by one and glued it.

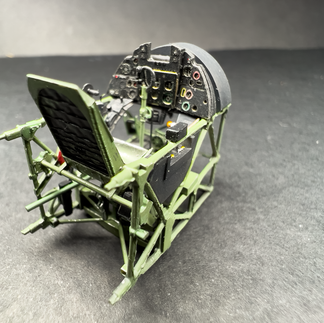
Next I took care of the main instrument panel. I bought a counterpart from Yahu as the quality of they work is just amazing! The only problem in this case was that it came as a one flat PE part. It had some pre made spots where you can bend it to adjust it but that was not enough to solve the problem as the instrument panel itself is not flat - left and right side is angled a bit which results in a design where the side panels are crooked a bit which creates indentation between them and the center panel. Additionally top of the center panel is inserted a bit deeper in respect to the bottom part. The only option was not to bend but to separate the PE part in two 4 pieces and glue them one by one to the resin backplate (I used Clearfix for that). In the Yahu set you can find as well a compass imitation which I attached to resin element and then glued it to the bottom of the instrument panel. Next I used Hataka NATO Black with a bit of Traffic White to paint all the edges of the PE parts to blend it together with the resin backplate.

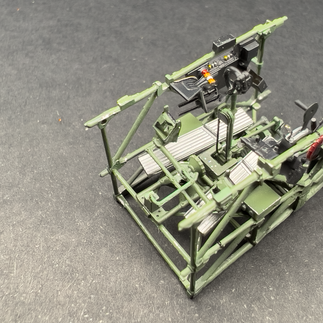
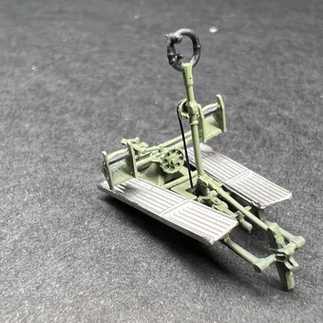
Next I decided to dry fit rudder pedals, pilot seat, main instrument panel and oil tank to check if everything fits together well and it did! Now it was good time to start preparing imitations of pipework and different kinds of cables - there was tone of it around the cockpit. I will recrate only part of that of course using different kinds of wires and soft pipes which will be painted in different colors according the my references.

I started weathering with application of Dark Green wash from PLW range over grey green areas of the cage and after 15 minutes I removed excess with clean brush. Silver kick plates of rudder pedals were treated with Orange Brown wash. Next I took care of the pilot seat. First I painted the leather pad which was used to protect the pilot hand while working the tire wheel and a hydraulic pump. To increase the shading of the seat itself I added a bit of Field Green Oilbrusher in the corners, waited 30 minutes and then blended it in with clean brush. Then I used paints from Drybrushing range to do just that - drybrushing. Next I returned to the cockpit and applied another layer of wash - this time I used a.Mig Earth to introduce dirt accumulations in the lower parts of the cage. Then black wash was used on certain elements to emphasize them. At that time I got back to the pilot seat again, this time to add lap belts - first I had to bend them appropriately and attached them with CA glue. Then I shaded them using Dark Mud and White Oilbrushers. Lastly I painted the buckles with Matt Aluminium. Then I returned to the rudder kick plates and added another weathering layer - this time I used Grime and Starship Grime Streaking Brushers.

At this point I attached to the cage the pilot seat, rudder pedals, seat back plate and the back rib. Then I took care of the back and head armour plate - first I attached belts and then a small part in front of it. Then I attached reflector site to the canopy rail with CA glue. Next I applied chipping to the canopy rail using Medium Gunship Grey and a small brush, next using same color I added more chips with the sponge. Next using off white color I dot painted rivets and then glued back and head armor to the canopy rail and protected everything with layer of Hataka satin clear XP08. As last step I used Molotw Liquid Chrome to reproduce a mirror which is located at the base of reflector site. Using same off black mix I chipped black consoles including main instrument panel and then applied Blue Grey wash on them. Next whole cage was sprayed with Hataka flat mat XP07.

At that time I realized that I forgot to paint front cockpit bulkhead, so I primed and painted it the same way as pilot seat including chipping, then I followed with weathering in a same way as for the rest of the cage parts. I got back to the canopy rail and weathered it with Blue Grey and Green Brown washes from PLW line, and then airbrushed layer of clear mat XP07. Next after checking my references it turned out that the oil tank should have Grey Green color so I repainted it and then weathered with Green Brown PLW wash and protected with layer of may XP07. As the tank was ready I attached it to the cage with CA glue. Now I added Airfield Dust pigment to the kick plates to introduce more dirt. Then I used different weathering pencils from AK to especially to emphasize edges of the black consoles. Next I airbrushed final thin layer of Hataka XP08 to protect everything and reduce a bit flat finish. When that was done I attached last element - main instrument panel and then used Dark Mud Oilbrusher to add colour to quilted cover of the pilot seat. As the last step I added all the cables and wires which I prepared earlier on - I had to be careful with that and check all the time if the placement of the cables is ok when whole cage is fitted to the fuselage halves.

Fuselage Halves

Painting and weathering of the fuselage halves was quite similar to what was done with the cage. The difference was that I did not spent so much time on weathering as those areas will be almost entirely hidden from the view when everything is joined together. I started with addition of small resin element to the fuselage sides, then primed it with Mr. Color 1500 black and then layer of base green gray color was applied to the bottom of the both fuselage halves. Then I post-shaded it with the mix of green gray and black. As soon as it was dry I masked it with Tamiya tape and airbrushed top parts with off black color using same mix as for the elements of the cage. Next using different colors of acrylics I painted all small elements and airbrushed everything with clear gloss GX112.
Next weathering followed - first chipping with Medium Gunship Grey, then highlights with a bit darker color. Next to introduce dirt I used same washes as were used for the internal cage. Then I attached cables using soft lead wire 0.2mm wire from Plusmodel and painted them accordingly. As a final step layer of sating XP08 was applied.
Summary
It was quite a lot of work to construct, paint and weather resin cockpit for the Tempest, especially taking into consideration that most of it will be hidden inside the fuselage halves when everything is combined together. Nevertheless I know its there and there are photos which shows how it looks like in all its glory. It was definitely the most complex resin set I have done so far with a lot of really small and fragile elements which required a lot of patience and care when being taken care of. I really like the end result and I am happy that I decided to go for it because as always I learned a lot.

Next step in building Tempest will be either engine or fuselage assembly and flaps - have not decided yet. Below is the gallery with quite many photos so check it out. At the very end please leave a comment dear reader if you wish so!


Comments