
Ju88 Night Fighter Base Painting
- Lukasz Gmerek
- Apr 1, 2024
- 6 min read
The Junkers Ju 88C 6-b from 3./NJG 4 (3C + LL) had the typical late war look, with RLM 76 as the main color and RLM 75 mottled over the top, along with RLM 70 on the propellers.

It was my first time dealing with this type of camo, which presented a real challenge. There were two main issues I had to overcome. Firstly, I needed to find the right method to paint so that the surfaces didn't end up looking flat and uninteresting, especially since the entire model was covered in one main color. Secondly, using the airbrush to create the mottled effect required a lot of precision and making sure the paint was thinned just right.
Before I start to describe painting process, I need to share a big mistake I made with the base paint color. Usually, I order all the paints I need before I begin working on a model, and this time was no different. Unfortunately, I didn't realise that I ordered the AK Interactive RLM 76 late war version of the color. As I focused on completing each step correctly during painting, I didn't notice the mistake until it was too late. The late war version of RLM 76, used in 1945, had a more greenish/yellowish hue compared to the standard RLM 76, and it's certain that Ju88C night fighters weren't painted with this late version.
When I realised my mistake, the only solution was to start over, but first, I needed to give myself some time to calm down. I was so mad at myself for not double-checking the color before starting.
To begin again, I had to remove all the paint. I used Paint Stripper from AK, applying it with an old brush and then carefully using cotton pads and swabs to remove the paint without damaging other painted parts like the landing gear or engine radiators. It's easy for the liquid to seep into even masked areas of the model, so I had to be careful. It was also important to control how much Paint Stripper I applied since it's a strong product that could react with the plastic itself.
Once the paint was removed, I had to prepare the surfaces for a new layer of primer. First, I smoothed out any rough spots left from the paint stripping using sanding pads of different grades depending on the surface quality. After making sure everything was cleaned up and there was no paint left, especially in the crevices, I applied the primer and started painting all over again.
This experience taught me an important lesson for future projects: always double-check colours, especially when there are different variants available.
Base Painting
My aim was to achieve a base color that had its own intriguing characteristics, with subtle shades, blemishes, and imperfections. This, combined with weathering later on, would give a really appealing finish. Applying just one color of paint to all surfaces, especially on a larger model like this, would result in a very flat and uninspiring look. To avoid this, I employed a combination of different techniques.
STAGE 1: Preshading

I began by employing the preshading technique, but I took a more intricate approach than usual. Firstly, I preshaded the primary panel lines using AK NATO Black paint. Achieving fine, narrow lines required careful dilution of the paint to prevent uneven spraying patterns while keeping the airbrush close to the model's surface. Next, I covered some of the panel lines with a lighter color.
In the following step, I airbrushed various panels with different colors to introduce subtle variations in the base color. I aimed for a varied look, and I believe I succeeded in achieving that. Since my knowledge of color theory is limited, I had to make some educated guesses. Initially, I chose analogous colors to the base color (blue and green), then experimented with orange, which is close to a complementary color, and finally, I used a neutral shade. All hatches and openings were coated with white paint. It's worth noting that I airbrushed the paint unevenly over the panels to add more visual interest to the finish.
STAGE 2: Transparent layers RLM 76

During this phase, the goal was to coat all surfaces with several thin layers of the base color while keeping the preshading visible. To achieve this, I heavily diluted the base color (approximately 1 part paint to 5 parts thinner). While airbrushing, I paid close attention to ensuring an even distribution of paint to maintain consistent transparency of the preshading across the entire model. A helpful tip is to take breaks after applying 2 or 3 layers and check the model after some time. It's possible that it may be sufficient and another layer isn't necessary.
STAGE 3: Marbling with Stencils

This stage aimed to introduce paint imperfections, blemishes, and local discolouration using a marbling technique with stencils. Firstly, I mixed the base color with white and diluted it significantly. Then, I airbrushed it through the stencils. The distance between the stencils and the surface determined the intensity of the effect; closer placement resulted in more defined spots of paint. In the second step, I created a darker mix and applied it similarly. It's important to control the intensity of the marbling so that it's not evenly spread across the entire model, adding to its realistic appearance.
STAGE 4: final blending layer RLM 76
As the final step of the painting process, I applied a blending layer, which is crucial for defining the final appearance. Once again, I heavily diluted the base color and applied it in very thin layers while constantly checking the resulting finish.
Balancing all the stages properly is the most challenging aspect of this approach. There are two key considerations:
1. Ensuring just the right amount of transparency after stage 2. If it's too high, the differences between colors will be too drastic, or the marbling layer will disappear as we try to cover those differences. If it's too low, the preshading will vanish during the application of the blending layer.
2. Achieving the proper thickness of the blending layer in stage 4. If it's too thick, the color will appear flat. If it's too thin, the differences between shades will be too stark, resulting in an artificial and unrealistic look to the painting. Balancing these aspects is essential for achieving the desired final result.

Mottled Camouflage
The main challenge for me was airbrush work. Doing mottled camouflage without using any templates requires a high level of precision and careful preparation of paint. I chose not to use templates for two reasons. Firstly, I wanted to improve my skills with the airbrush, and secondly, I aimed for softer edges on the mottles, and to achieve that with the templates I would have to keep them at certain distance from the surface and it would be hard to keep it consistent all over the model.

To begin, I marked the outline of each mottle on the model's surface using a pencil. It was important to make these marks slightly smaller than the desired final size so that they would be fully covered by paint later on. Next, I carefully diluted the RLM 75 paint to the right consistency. The mixture needed to be thin enough to spray at very low pressure without causing spidering. After a few tests, I found the perfect mix ratio (approximately 1 part paint to 4 parts thinner).
When it came time to paint, I selected my Harder & Steenbeck Infinity airbrush with a 0.15 needle and no air cap. Holding the airbrush with both hands, I sprayed each mottle slowly and steadily, starting from the center and working outward. I aimed to maintain the correct angle to the surface to minimise overspray and ensure even edges across the entire model.

As a final step, I applied a very thin layer of the base color to blend everything together. While this worked well for overall cohesion, it unfortunately made the preshading barely visible. However, the mottled camouflage itself draws all the attention, so this is not a problem, but it's a lesson learned for the future: always leave surfaces slightly more transparent to the preshading so that additional layers can be applied without losing detail.
To complete the base painting, I carefully inspected the entire model and fixed any areas with slight roughness by sanding them with high-grade sanding pads and airbrushing them with the base color. Lastly whole model was covered with the proper layer of gloss layer of Mr. Colour GX varnish.

Closing Words
It was indeed a challenging finish for me, demanding a great deal of focus and attention to detail. However, the effort was truly rewarding, as I'm pleased with the results. I largely achieved the finish I had envisioned and planned, which demonstrated to me that I have a good grasp on controlling the airbrush and layering techniques to create a more complex base finish.
It's important to recognize that achieving this level of proficiency comes with experience and having worked on at least a few models. So, if things don't turn out as expected the first or second time, don't be discouraged. Keep practicing and refining your skills, and you'll gradually see improvement.
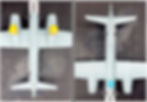
Please check below photos from the finished painting process. As always in case of questions or feedback please leave comment. Surely I will answer.


