
Tempest Main Landing Gear & Gun bays
- Lukasz Gmerek

- Jan 6, 2022
- 5 min read
Updated: Jun 23, 2023
Building aircrafts mostly starts with the cockpit and according to the instruction booklet of Eduard 1:48 Hawker Tempest Mk V series 2 it is no different than that. Normally I would follow along with it, though as I acquired many aftermarket sets I need a different approach. In such cases first thing I do is carefully studying instruction booklets of the model and aftermarket sets to learn which of the original parts of the model will have to be modified (removed or grinded) and to understand how those additions will fit together in the end. Such approach allows to safely change and adjust an original build order to accommodate all the additions the best I can.
In case of this model it turned out that it its best to start with the wings and there are two main reasons for that. First is that this area requires most modifications to fit gun bays, flaps and even part of the engine. Secondly, to make space for the flaps I need to remove bit of plastic from the fuselage as well (at the wings root trailing edge). It will be much easier to check how much to remove heaving wings ready and dry fitting them to the fuselage.

I started with removal of the plastic flaps representation from the bottom part of the wings. Next I made openings for the gun bays in the top parts of the wings by cutting away superfluous plastic. For both operations first I used my Proxxon Micromont 230/E and PS13 Pensander tools and then different grinding files to nicely even everything out.
Before proceeding with the build I took all the PE sets and sprayed them with Tamiya metal parts undercoat.
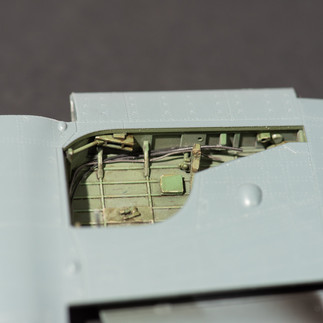
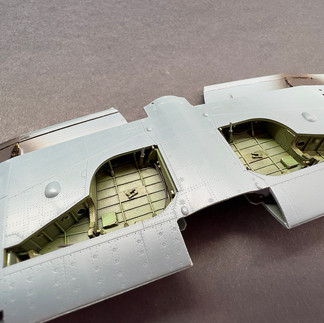
Main Landing Gear Bays
I started with cutting out all required parts, including additional PE from Eduard upgrade set. After cleaning all the plastic parts with sanding sticks I took care of PE - first I cleaned them up, then bended them accordingly and attached to the original parts. Next I glued everything to the top parts of the wings according to the instruction booklet. Then I cleaned it up with IPA and it was ready for painting.

First I primed everything with Mr.Hobby 1500 Black. I prefer to use black primer in places like cockpit or different kind of bays as this allows me to use that layer to introduce shadows in corners and crevices by proper application of main colour - in this case it was Mr. Color Grey Green which I airbrushed with Iwata HP-CH. Next I mixed base color with black, diluted it quite heavily and airbrushed with Infinity onto the gun bay floor panels to make them darker and then followed with a thin layer of original color to blend it all together. Lastly I protected everything with layer of clear gloss GX112. Next I brush painted small parts with A.mig acrylics. The instead of using flat wire imitations from Eduard set I used different kinds of products for that - 0.3mm lead wire from Plusmodel which I then painted with rubber and tires color, 0.4mm Soft Pipe from Riich and 0.3mm black copper wire.

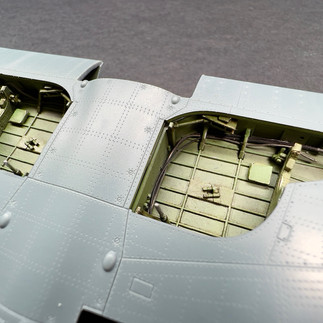
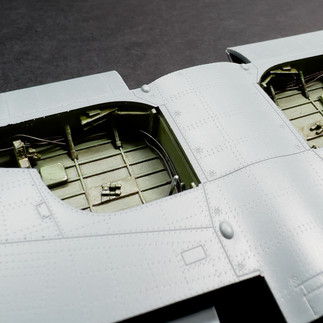
Now it was time to start weathering. First chipping - I used three different colours. First one was a mix of Vallejo Luftwaffe Camouflage Green and White - this gave me a bit lighter shade of Mr. Color Grey Green base. Next one was A.mig rubber and tires and third one A.mig aluminium. I applied brush chipping technique and at the end I used sponge as well. Next I used same mix of green grey and white to do edges highlighting. Then I used drybrushing technique to further enhance protruding elements - for that I used green color from A.mig Drybrush range of paints.

Next pin wash followed. I used for that Green Brown color from PLW range. Layer of flat mat GX114 followed to protect the world and kill the shine. Now I used weathering pencils from AK Interactive (dark green, aluminium and sand) to introduce more scratches and paint flakes. Next I tried new product - Abteilung 502 oil paints - I used green and cream brown in specific places to introduce discolouration and dirt. Layer of semi gloss clear X-35 followed. At the very end I used different washes from A.mig and AK to add grease and dirt accumulations.
Having main landing gear bays ready and interior structure of the gun bays in place (you can read more about below) I could join top and bottom parts of the wings. For that I used Tamiya Plastic Cement and CA glues.

Gun Bays
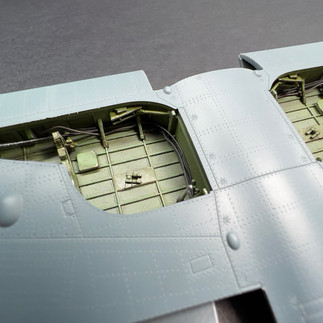
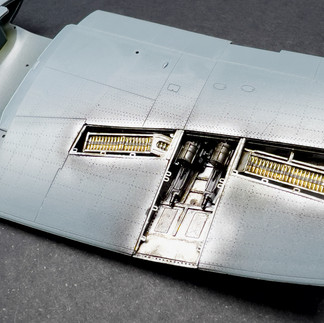
I started with cutting out main gun bay structure from its casting block and cleaning it up. Next I dry fitted it to the earlier prepared opening in the top wing part. It turned out that due to the already attached main landing gear bays I had to modify the resin element a bit to fit it in. Adjustment was easy and simple - I just had to remove bit of material at one of the corners as it overlapped with plastic parts from the gun bays.

In the next step I add small details to the bottom PE floor and attached it with CA glue to the resin framework. Then I took care of a small separate part aft of the guns - this consists of PE element and resin ending which should be fitted so it aligns nicely with the wing trailing edge. Lastly I added PE frames at the top of the gun bay.

Painting started with application of primer - Mr.Hobby 1500 Black, then GX2 gloss black base followed. Next everything was sprayed Silver. Lastly I protected it with layer of clear gloss GX112. Same procedure was used for ammunition canisters, except for the guns which after receiving gloss black base were painted with Dark Iron and Stainless colours and as soon as dry were buffed with small cotton buts.

NextNexNeNAs a next step I painted ammunition belts with rubber and tires color and projectiles themselves with brass - I used here Gunze paint from metal color range (as with machine guns) - they cover really well and are buffable which generates really nice effect. Next I used different colours from Vallejo acrylics to paint small details on the ammunition canisters. I started weathering of gun bay with application of Black and Green Brown washes from PLW line. Next I sprayed satin clear coat of Hataka Orange. Then I glued ammunition canisters and machine guns with CA glue. Then Dark Streaking Grim and Streaking Grim products followed to introduce more variety and dirt to the silver interior of the gun bays. As a next layer athering I applied AK Shafts nad Bearings and Engine & Turbines washes - these products were more focused on specific places to show stains and filth due to usage. Lastly I applied AK Landing Gear Dust wash to introduce dust and top of that I added Light Dust pigment to intensify the effect.

Having main landing gear and gun bays ready in the next stage I will take care of the resin cockpit and then engine and fuselage assembly will follow.
Small gallery of photos below.


As always, if you have any questions or comments please leave them below.
Comments